Using Sketchup for comic book illustration...
-
Hey I am illustrator for various comic book companies and for years now I have been drawing all of my background work by hand, now that I am trying to use sketchup to improve my work flow I have hit upon a few problems.
-
Is there a way to add a perspective grid to every component in a model with out doing by hand?(This is what I have been doing with the google "Grid" plug-in) It is very tedious and laborious when applying it to entire cityscapes.
-
When I create a style it never saves all of the options I have, I still have to turn off shadows and turn on hidden geometry. Nitpicky I know but is there a way to simplify this?
What I am looking for is clean detailed black and white line drawings to use in my work.
Any help would be very appreciated.
-
-
for #1, what do you have in mind? What does it look like? I'm sure a plugin could be written to do that, if it is as simple as I am thinking.
#2 - I tend to use scenes to manage my shadow settings. I often have many scenes in the model that ONLY hold shadow information. Then I can switch quickly between scenes to change my shadows how I need them. I also make scenes this same way to manage jsut camera positions (independent of styles, or shadows). So its easy this way to work in a simple style, change camera positions by using scenes, then turn on the final desired style when I'm ready.
I think using scenes to mange the model in this way is extremely useful!
Chris
-
I wish I knew how to write ruby scripts.
What I am looking for is a way to(for example a simple city scape) add a perspective grid that wraps around the entire component(s)in the model almost like a grid texture, so I can use that to add detail when I take the printed out 2d graphic and light box it into a finished page of artwork. Also If I could change the scale of the grid that would be key.
-
This is my copied solution from the sketchup help forums, the work around works but...
"I want to wrap entire models in a 1'x1' grid. I found a work around using Gully's answer but modified. I altered the tile so it is a white tile with a black border. I then selected everything in a layer and "painted" it with the grid texture. Finally to get rid of the shaded part of shaded with textures, I went into shadows and moved the sliders all the way to white. What I am looking for is complex cityscapes that are generally not detailed(It would be easier if they were instead of just textured) with the grid on every surface so when I lightbox the images I have that perspective grid to use as guidelines for more complex renderings. I want them in a plain black and white line art form.
It works but there really has to be a more elegant solution to the problem. It would also help when constructing to have that adjustable grid on every surface so measuring where to place components would be more intuitive."
...There has to be another way. The tile in question is just a 1x1 square with a top and right border in black.
-
I'm suire it makes sense in your head, but I'm sort of lost for precisely what you want. Do you want it just around the components bounding box? Or a full 3d grid of lines throughout the component? Or is it really a material painted onto the surface of the component only? - that requires UV coordinates which is a totally different problem!, os really just a screenshot of what you have or what you are thining of would really go a long way to help clear up the picture in my mind. Thanks!
Chris
-
you could try slicer ruby. is this what you want?

-
That is exactly what I am looking for, does that work in hidden line view or does it work as a texture?
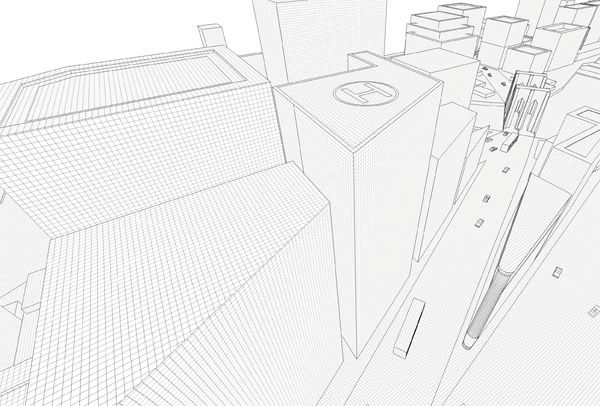
This is an example of what I got using the texture method over a scale model of Manhattan
-
Trying out slicer right now. Thanks!
-
Yeah, slicer! I think that is a good fit for what you are looking for Kris. I hope it works well.
Chris
-
would be nice if someone chris would modify the code for you so that it did x,y,z all at the same time and didn't make internal faces.

-
I agree but it quickly does the trick, I am using both methods for various pages. I'll show an example or 2 when they're done.
-
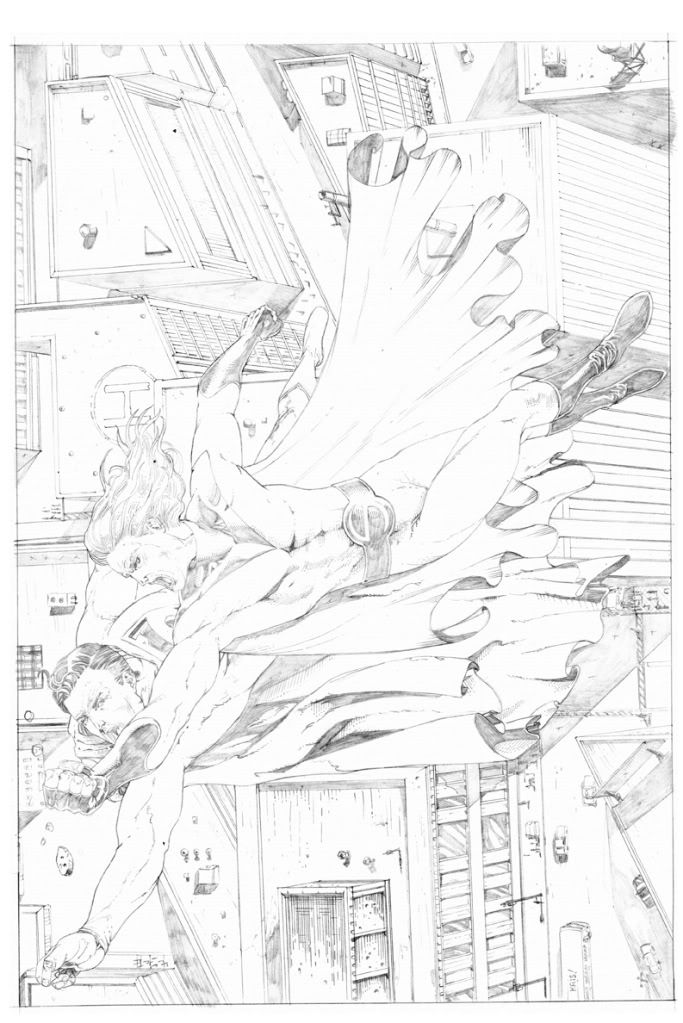
First work done with Slicer.
-
very impressive! so you're drawing over top of the SU model as a guide? very clever.
-
And accurate, and time saving!


Advertisement